Angel LM

Forum Replies Created

Viewing 15 posts - 121 through 135 (of 285 total)
  • Author
    Posts
  • in reply to: Programacion de articulaciones con mas de un motor #1897
    Angel LM
    Admin

      Hola Sebas,

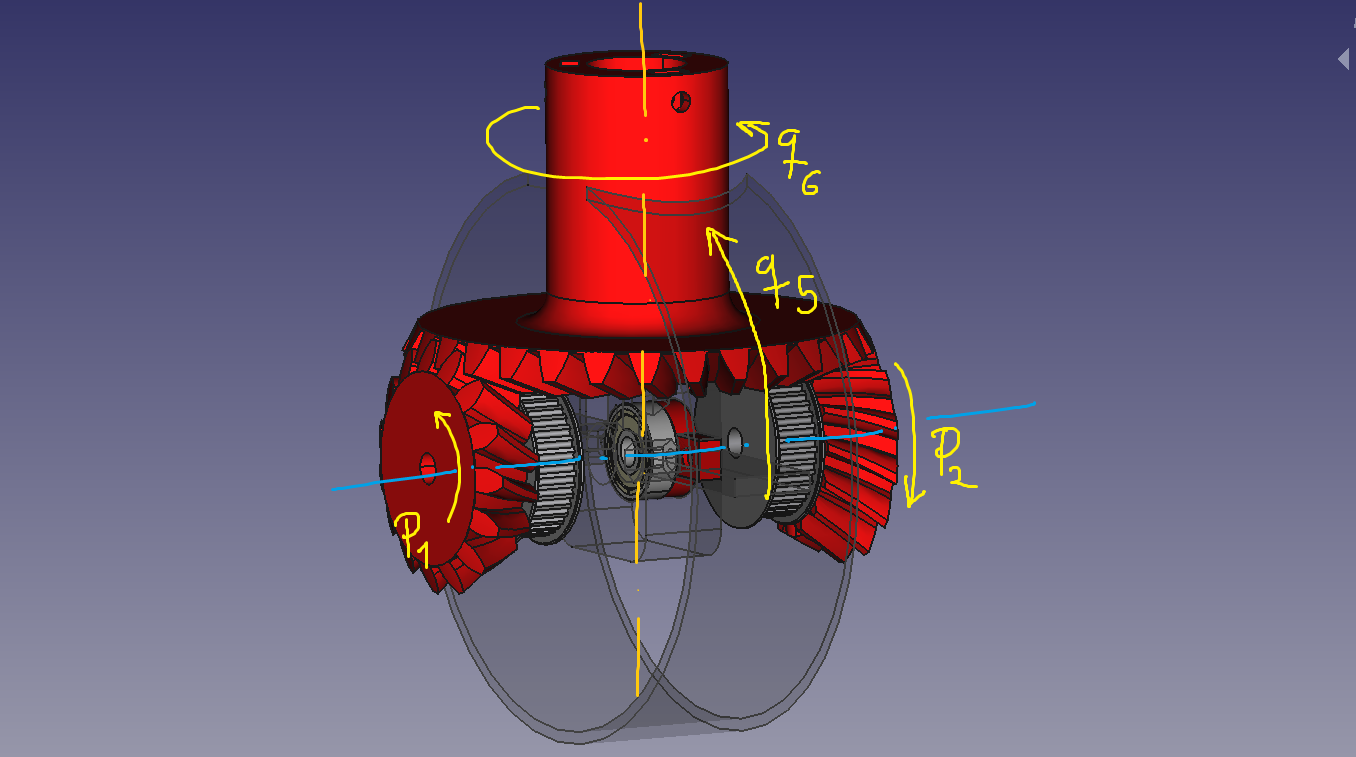
      La articulación 5-6 es un mecanismo conocido como semi-diferencial. Este mecanismo permite conseguir rotación en 2 ángulos (q5 y q6) utilizando dos piñones y una corona. En este video puede verse el funcionamiento.
      Recuerdo que hace años, cuando resolví la cinemática directa e inversa del robot, encontré una relación entre los ángulos de giro de cada piñón y los ángulos q5y q6, aunque por más que he buscado no he dado con ello.
      La teoría era la siguiente:
      – Si los dos piñones giran el mismo ángulo en el mismo sentido, se produce una rotación en q5 y q6 no rota.
      – Si los dos piñones giran el mismo ángulo en sentido inverso, se produce una rotación en q6 y q5 no rota.
      – Si el piñón A gira un ángulo distinto al piñón B, se produce una rotación en q5 y en q6. Existe una relación entre el ángulo que gira cada piñón y los ángulos q5 y q6.

      A ver cuando puedo ponerme a documentar la cinemática del robot y volver a calcular esa relación de nuevo.

      ¡Un saludo!

      —-

      Hi Sebas,

      The 5-6 joint is a mechanism known as semi-differential. This mechanism allows to achieve rotation at 2 angles (q5 and q6) using two gears and a crown wheel. In this video you can see how it works. I remember that years ago, when I solved the direct and inverse kinematics of the robot, I found a relationship between the rotation angles of each pinion and the angles q5and q6, although I have not found it.
      The theory was as follows:
      – If the two gears rotate the same angle in the same direction, there is a rotation at q5 and q6 does not rotate.
      – If the two gears rotate the same angle in the reverse direction, a rotation occurs at q6 and q5 does not rotate.
      – If the A gear turns a different angle than the B gear, there is a rotation at q5 and at q6. There is a relationship between the angle that each pinion turns and the angles q5 and q6.

      Let’s see when I can get around to documenting the robot’s kinematics and recalculating that ratio again.

      Regards!

      in reply to: Asgard Connects but sits on ‘Idle’ #1896
      Angel LM
      Admin

        Hello tpluke,

        Let’s try to check what’s going on. First of all, have you installed GRBL following the instructions of the Control Software documentation page?

        in reply to: Modelo Cinemático #1891
        Angel LM
        Admin

          Hello Sebas!

          Thank you very much for your interest in this project! A few years ago I made this post on Hackaday about Thor’s direct kinematics, you may find it useful for what you are telling me.

          If you want to post some images in the forum of your schematics, you can upload the images to https://imgur.com/ (for example) and share the link in the post!

          Hope it helps!

          in reply to: Greasing printed elements #1888
          Angel LM
          Admin

            Hi Karlo!

            Welcome to the Thor community! I’m glad you have chosen this project, feel free to post your progress on this forum!
            Regarding your question, I have not used grease on the printed gears so I guess that it’s not neccesary, but as long as it does not drip on the electronic components, it would not be a bad idea to use it!

            Best regards 🙂

            in reply to: Motor’s #1887
            Angel LM
            Admin

              Hi Adrian,

              Thank you for noticing that the BOM links where not correct! 🙂
              I updated the motor ones. I’ll check the rest ASAP to ensure that every link works.

              in reply to: Servo Motor #1885
              Angel LM
              Admin

                Hi stefan,

                Nice question! That is a connector I made soldering a 3 male pin connector (like this one) to a piece of universal PCB (like this one). Of course, I soldered 3 wires to the terminals on the back of the board that I ran all the way down the arm to connect to the board at the base.

                It serves as a connection interface to plug any kind of actuator that needs (VCC, GND and Signal).

                Hope it helps!

                in reply to: Hello from Poland #1884
                Angel LM
                Admin

                  Hello Bartek!

                  I’m sorry for this late reply, but welcome to the Thor community! I’m very happy that you and your son have chosen this project to build something together!
                  It has been 3 months since your post. Have you finish the assembly? I’m very curious to see how it turned out 🙂

                  Best regards!

                  in reply to: Bearing between Art3 and Art4 #1883
                  Angel LM
                  Admin

                    I’ll check it out ASAP, thank you very much for sharing it!

                    in reply to: Worlwide Section #1882
                    Angel LM
                    Admin

                      Wow EleKoPhi, it looks amazing! 🙂

                      Can I ask where are you from? To add your Thor to the Worldwide Section!
                      Also, if you have posted your roadmap anywhere, I’ll be glad to include it also 😀

                      Best regards!

                      in reply to: inverse paul yöntemi #1874
                      Angel LM
                      Admin

                        Hi Hüseyin,

                        Yes, I have solved the inverse kinematics. As soon as I have some time I’ll write the Kinematics documentation.

                        in reply to: Control PCB setup #1872
                        Angel LM
                        Admin

                          Hi Huggy!

                          I’m sorry the documentantion is not clear in this specific topic, I’ll try to fix it in the future. Meanwhile, at BOM you can find the components and their references. The references are printed directly in the PCB in the places you should solder the components. There is also a electronic schematic of the Control PCB in its Github Repository that you can check.
                          The wiring diagram on the Electronics documentation is helpful to know how to connect the motors, fans and sensors once you have soldered the PCB.

                          Hope it helps!

                          in reply to: Bearing between Art3 and Art4 #1870
                          Angel LM
                          Admin

                            Hello Robour!

                            If you can share the Step file I would be glad to check it out! I used the 3D printed bearing because I did not find any other solution to that articulation… The printed bearing is not bad, but it can be tricky to print and it has some backslash, so if there is any better solution im all ears!

                            Thank you!

                            in reply to: Presentacion #1863
                            Angel LM
                            Admin

                              Hola Israel, ¡bienvenido a esta comunidad!

                              Lo único que se me ocurre para solucionar el problema de la reductora del motor es que, en los parámetros de configuración de GRBL ajustes los asociados a los motores de las articulaciones 2 y 3 (que son los que van con reductora).
                              Esto es, sustituir los parámetros:

                              $101=270.000 (b, step/mm)
                              $102=270.000 (c, step/mm)
                              $103=265.000 (d, step/mm)

                              por los parámetros:

                              $101=1026.000 (b, step/mm)
                              $102=1026.000 (c, step/mm)
                              $103=1007.000 (d, step/mm)

                              Si tienes dudas acerca de esto, échale un ojo a la página dedicada a la instalacion y configuración del firmware.
                              Y si te sutge alguna pregunta aquí estamos 😉

                              in reply to: Problemas con la instalación de Asgard #1861
                              Angel LM
                              Admin

                                Buenos días Sergio, feliz año nuevo!

                                Perdona que tarde en contestar, he estado desconectado estas navidades jejeje

                                Por lo que comentas puede ser que el comando que tengas que ejecutar sea python3 en lugar de python. Prueba a abrir la consola y ejecutar python3. Si te sale el mismo error, puede que sea otro el problema y te recomendaría instalar python directamente desde el instalable de la página oficial de Python y durante la instalación asegurarte que seleccionas la opcion de incluir Python en el PATH como muestra la siguiente imagen:

                                Add python to path installer

                                Despues de esto, prueba a abrir una consola y ejecutar python o python3.

                                ¡Un saludo!

                                • This reply was modified 2 years, 10 months ago by Angel LM.
                                in reply to: PCB buy/manufacture question #1860
                                Angel LM
                                Admin

                                  Hello!
                                  In PCBWay you only can buy the raw PCB, the board with no componentes soldered. You have to buy the components in other site and solder them. You can check the Bill of Materials section and the Electronics page for more info!
                                  The SMD-Stencil helps you to apply the solder paste (if you are using it to solder), but it is not neccessary (I didn’t used it).

                                  Hope it helps 😉

                                Viewing 15 posts - 121 through 135 (of 285 total)