Forum Replies Created
-
AuthorPosts
-
It will be a pleasure! I will need a photo of your Thor and (optional) a link to a blog of the project or something similar 🙂
Hi! The reference of the fuse I used for the Control PCB Board is MF-R700 which is a Polymeric PTC Resettable Fuse 30V 7A.
Hope it helps!
Hi Mendy,
750g refers to 750g minus the weight of the tool.
Anyway, I did that test quite some time ago and I am not sure that the value is correct, it will be around that value, but I would not take it as a reference.Hope it helps!
Hi jose,
If you mean the PCB schematic, is already available at Downloads section, (Gerbers and KiCad source files) or if you prefer GitHub: ThorControlPCB repository.
Hope it helps!
I have added yout entry to the Worldwide Section 🙂
When you have that article published, let me know so I can link it 😉Great job!
I couldn’t help myself and have been thinking about this.
I think the solution is as follows if we take into account the following sign convention for rotations: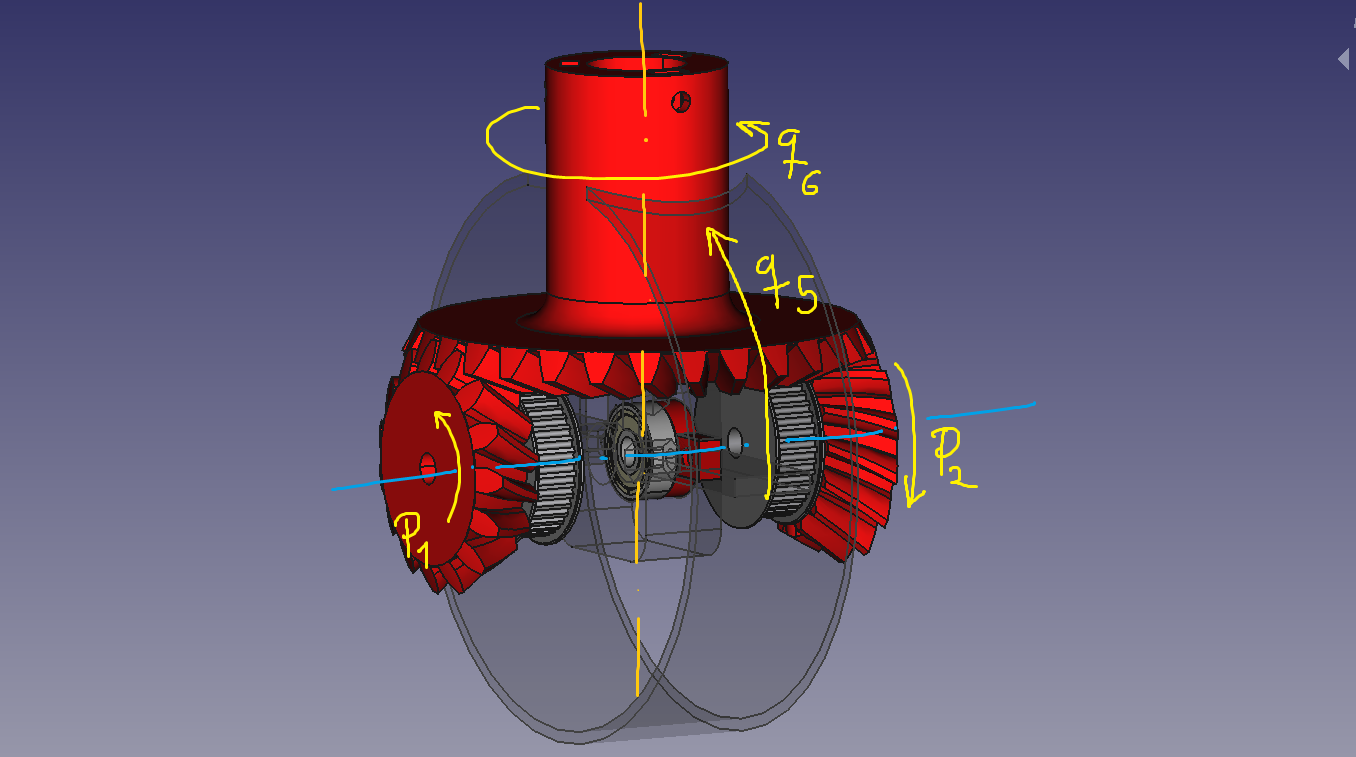
p1 represents the angle rotated by pinion 1.
p2 represents the angle rotated by pinion 2.
q5 and q6 refer to the angles of joints 5 and 6 respectively.I think these equations are correct:
q5 = (p1-p2)/2
q6 = r*(p1+p2)/2
r = pinion teeths / crown wheel teethsI have obtained these equations by an empirical analysis of the problem and not by analyzing in depth the theory of the mechanism, so I could be wrong.
I hope it helps!
Hola Sebas,
La articulación 5-6 es un mecanismo conocido como semi-diferencial. Este mecanismo permite conseguir rotación en 2 ángulos (q5 y q6) utilizando dos piñones y una corona. En este video puede verse el funcionamiento.
Recuerdo que hace años, cuando resolví la cinemática directa e inversa del robot, encontré una relación entre los ángulos de giro de cada piñón y los ángulos q5y q6, aunque por más que he buscado no he dado con ello.
La teoría era la siguiente:
– Si los dos piñones giran el mismo ángulo en el mismo sentido, se produce una rotación en q5 y q6 no rota.
– Si los dos piñones giran el mismo ángulo en sentido inverso, se produce una rotación en q6 y q5 no rota.
– Si el piñón A gira un ángulo distinto al piñón B, se produce una rotación en q5 y en q6. Existe una relación entre el ángulo que gira cada piñón y los ángulos q5 y q6.A ver cuando puedo ponerme a documentar la cinemática del robot y volver a calcular esa relación de nuevo.
¡Un saludo!
—-
Hi Sebas,
The 5-6 joint is a mechanism known as semi-differential. This mechanism allows to achieve rotation at 2 angles (q5 and q6) using two gears and a crown wheel. In this video you can see how it works. I remember that years ago, when I solved the direct and inverse kinematics of the robot, I found a relationship between the rotation angles of each pinion and the angles q5and q6, although I have not found it.
The theory was as follows:
– If the two gears rotate the same angle in the same direction, there is a rotation at q5 and q6 does not rotate.
– If the two gears rotate the same angle in the reverse direction, a rotation occurs at q6 and q5 does not rotate.
– If the A gear turns a different angle than the B gear, there is a rotation at q5 and at q6. There is a relationship between the angle that each pinion turns and the angles q5 and q6.Let’s see when I can get around to documenting the robot’s kinematics and recalculating that ratio again.
Regards!
Hello tpluke,
Let’s try to check what’s going on. First of all, have you installed GRBL following the instructions of the Control Software documentation page?
Hello Sebas!
Thank you very much for your interest in this project! A few years ago I made this post on Hackaday about Thor’s direct kinematics, you may find it useful for what you are telling me.
If you want to post some images in the forum of your schematics, you can upload the images to https://imgur.com/ (for example) and share the link in the post!
Hope it helps!
Hi Karlo!
Welcome to the Thor community! I’m glad you have chosen this project, feel free to post your progress on this forum!
Regarding your question, I have not used grease on the printed gears so I guess that it’s not neccesary, but as long as it does not drip on the electronic components, it would not be a bad idea to use it!Best regards 🙂
Hi Adrian,
Thank you for noticing that the BOM links where not correct! 🙂
I updated the motor ones. I’ll check the rest ASAP to ensure that every link works.Hi stefan,
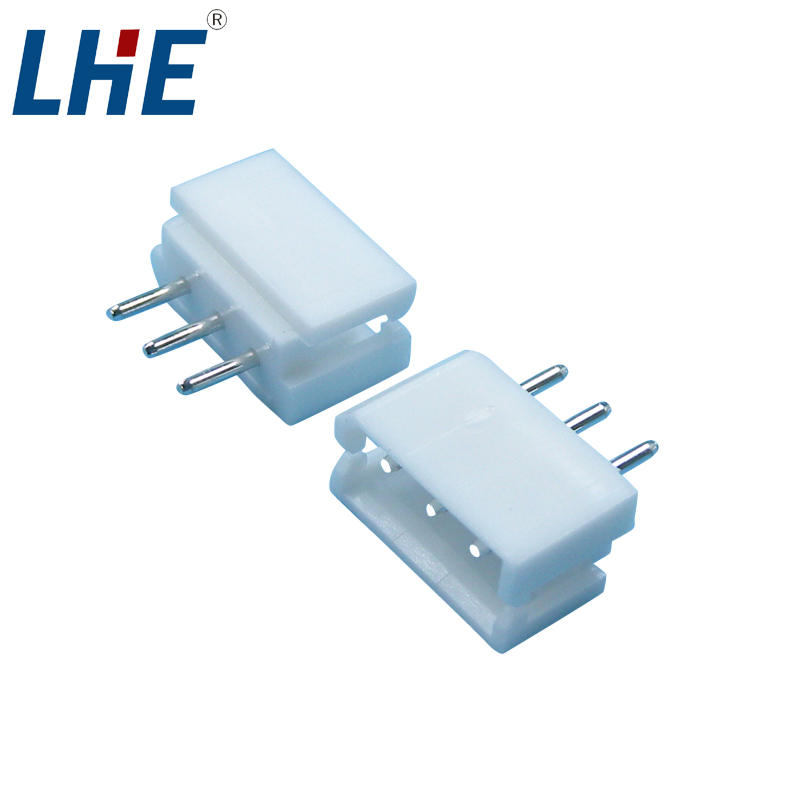
Nice question! That is a connector I made soldering a 3 male pin connector (like this one) to a piece of universal PCB (like this one). Of course, I soldered 3 wires to the terminals on the back of the board that I ran all the way down the arm to connect to the board at the base.
It serves as a connection interface to plug any kind of actuator that needs (VCC, GND and Signal).
Hope it helps!
Hello Bartek!
I’m sorry for this late reply, but welcome to the Thor community! I’m very happy that you and your son have chosen this project to build something together!
It has been 3 months since your post. Have you finish the assembly? I’m very curious to see how it turned out 🙂Best regards!
I’ll check it out ASAP, thank you very much for sharing it!
Wow EleKoPhi, it looks amazing! 🙂
Can I ask where are you from? To add your Thor to the Worldwide Section!
Also, if you have posted your roadmap anywhere, I’ll be glad to include it also 😀Best regards!
-
AuthorPosts