- This topic has 5 replies, 3 voices, and was last updated 9 years, 4 months ago by
 Angel LM.
-
AuthorPosts
-
March 5, 2017 at 1:16 pm #605
Hi! My name is Manuel Miramontes, and I’m a member of Bricolabs (bricolabs.cc), a makerspace at Corunna, in the North-West of Spain. Our github is https://github.com/brico-labs. I meet Angel and saw the Thor robotic arm first time at the OSHWDem (oshwdem.org) a Open Source demostration faire that is organaized by Bricolabs since 2001. It looked really amazing.
In “my other life” I work in the Science Museums of A Coruña (http://www.mc2coruna.org/) as exhibitions developer. Those days we were dealing with an exhibition about astronomy and outer space exploration, and we thought in an exhibit with a robotic arm. After meeting the Thor arm, it was clear for me that it will be amazing to incorporate an Open Source component in the exhibition, build by a Open Source community. So I ask to Bricolabs if they can collaborate in that project. They received the project joyfully (thanks to all), and started printing the parts.
Actually the robot is almost printed, an I hope that we will start assembling it this week. I will send soon photos of the progress.
Thanks to Angel, to all of you, and to all the Open Source Community
March 9, 2017 at 9:27 am #1217;Hi Manuel!
It sounds cool! I can’t wait to see photos 🙂
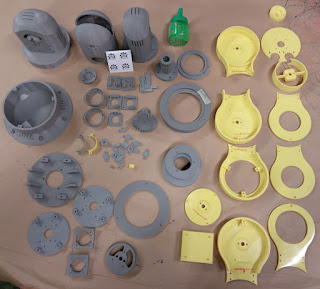
Best regards,ÁngelMarch 26, 2017 at 12:41 am #1219Finally we start assembling the arm. First here is the group photo with almost all of the printed parts. It was a hard work. Thanks to any of the collaborators that contributed.
And here are some of the photos of the assembling of the body and first articulation. We discover that this is not the “natural” assembling order because we will have some difficulties conducting the wires from the upper articulations to the base. But we will deal with that…
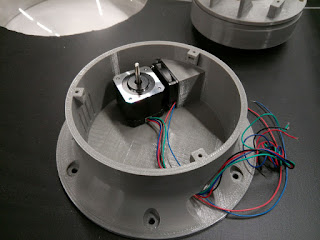
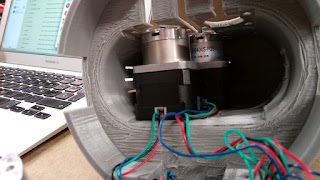
Perhaps the more time consumer step was the assembling of the three geared motors inside the first articulation body.
 March 27, 2017 at 2:13 am #1221
Hello Manuel, excellent work.
I am in the process of assembly the base and the Articulation 1, but it is a little confuse. How do you do thatMarch 27, 2017 at 11:10 pm #1223Ok. We did about infinite attempts to assemble it, but with a little help of Angel, it was easier that it seemed 😉
First we take out the eight screws that come with the articulation two stepper, the upper one. Four large cone headed screws for get the stepper parts joined, and four cylindrical head screws in the front that fix the gear block.After that we slide the stepper + gear block in the central slot, and fix the stepper with four 3×30 cylindrical head screws by the back.
Tip: it will be useful for you setting the stepper and routing the wires so they go to the right or to the left of the two lower steppers. Its not a good idea routing them vertically between the two lower steppers.
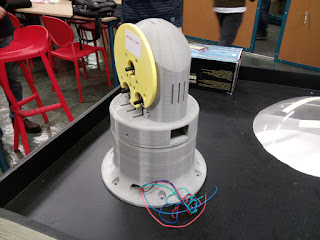
Now you can set in their position and fix the other two steppers + gear box by the back in the same way.
The more difficult part for us was fixing the steppers from the front after you have installed the Art2BodyACover1_01 ;piece. For that you need 8 screws that are shorter, something like 3×27 and two more indeed shorter than that. We trimmed them from the 3×30 screws. We experiment a lot of issues trying to get the screws enter in the stepper threads as straight as possible, and some of the screws threads get damaged, but at the end everything is fixed. (I hope)
I hope this is useful for anyone.March 29, 2017 at 10:06 pm #1225It looks awesome! Keep up the good work! 🙂
-
AuthorPosts


- You must be logged in to reply to this topic.